Showing posts with label pretty projects. Show all posts

Thursday, 27 November 2014

Market Snaps

Last Friday night I had the pleasure of having my very own market stall at the Elizabeth Handmade Market. I really enjoy markets! I loved busily preparing and sewing in the weeks beforehand, and styling my stall on the night (it makes me dream of having a little shop of my own one day!). I also really loved talking to all the different people who stopped by my stall and shared memories that were sparked by the vintage fabrics my dresses are made out of. I was able to debut my new dress design after finally perfecting the pattern and people seemed to really love them! I have also chosen to make my dresses from vintage and pre-loved fabrics only so as to make them sustainable and uniquely one of a kind! I'm planning to have them available in my Etsy shop over the next week or two so if you've got your eye on one keep a look out for that!

Tuesday, 18 November 2014

Asking My Bridesmaids


I had the pleasure of asking my beautiful best friends to be my bridesmaids over the last week or so and I thought I would share how I ended up asking them here. I knew that I wanted to make my bridesmaids something small and nice to keep as a momento and loved the idea of using vintage hankies when I stumbled across this, however instead of screen printing them, I decided to embroider them. I already had quite a few vintage hankies but I was after some extra pretty ones and so after a lot of op-shopping, visiting antique shops and even looking on Ebay I finally found five of the most pretty handkerchiefs! The embroidery did take a little while, but I really enjoyed it and am very happy with the end result. The girls really appreciated their little gifts and we are now all very excited to start the wedding planning!

Wednesday, 17 September 2014

How to Create an Inspiring Workspace

I find that having an inspiring workspace is one of the most essential ways to stay creative and motivated while working. Here are a few things I do to keep my space inspiring:

1. Keep it tidy. One thing that really motivates me and helps me get started on work (such as uni assignments or dress making) is a neat and tidy space. There is nothing worse then wanting to get started on something only to find you have to clean up your workspace first. A great way to keep your space neat and tidy every time is to clean up at the end of everyday, so that it is clean and ready to go the next day.

2. Choose a space with great natural light. I'm a huge fan of natural light. Not only does it make a space more inviting but it also helps you see what you're working on a lot more clearly, preventing you from having to strain your eyes. If your space doesn't have a lot of natural light, I'd suggest finding a space that does, as it really is easier to get started on your work when you have a lovely light and inviting space to work at.   

3. Stay organised. Having a calendar and some notebooks close by is a great way to stay organised. A calendar in your space (mine is a freebie that comes with Frankie magazine) will help you keep track of deadlines, and notebooks are always handy to write down lists in and little reminders in. I also use a handy downloadable to do list that really helps me to stay on track with the things that need to get done.

4. Fill it with things that inspire you. I think this is the most important step to create an inspiring space. Filling your workspace with things that inspire you will create a happy environment and will give you the creative boost you need when you are feeling a little unmotivated. I like to fill my space with inspiring magazines and books, teacups, flowers and little pops of mint green.

5. Flowers. A jar of flowers really freshens up a space and makes it a much better environment to work in. Not only do they look really pretty, but they smell amazing too. Surprisingly, these flowers lasted a good two or three weeks so it doesn't even require that much effort, as you don't even have to change them every few days. I'm definitely going to keep flowers in my space more regularly from now on.

I hope these tips were helpful for you! What things do you do to keep your workspace inspiring?

Monday, 8 September 2014

Retro Floral Dress

As mentioned in this post, I have been working on a new dress design, and after a few months of perfecting it, I finally felt it was ready enough to cut into some of my good fabrics with. I picked up this amazing retro floral fabric from an op shop months and months ago and I loved it so much that I knew I would have to make myself a dress out of it. I used my new 50's inspired dress design to make this dress as I wanted to test my new pattern and happily, it turned out just as I was hoping it would!

So I guess this is a little sneak peek of my new dress design I've been working on! As I said, it's a 50's inspired dress and features a gathered full circle skirt that sits at about knee height, a snug fitting bodice, cute capped sleeves and v-back neckline. I'm really happy with how it has turned out and I hope you will be too! I'm hoping to make this dress in sizes 8-18, so once I've tested each of these sizes to see if they all work as good as this one did, and have collected some pretty vintage fabrics to make this dress in, I will have it available in my Etsy shop. I'll keep you posted!

Sunday, 24 August 2014

How To Make A Granny Square

Today I'm sharing a tutorial on how to crochet a granny square. Granny squares are super easy to make once you know how, and the end result is adorable! At the moment I'm making a granny square blanket and if you would also like to, then hopefully this will help you get started! Crochet terms are different all over the world, but for this tutorial I will be using the Australian terms (the same as the British terms, I'm pretty sure!) Okay, let's get started!

First, what you will need:

+ Some cute and colourful wool.
+ A crochet hook (I used a 4mm crochet hook)
+ A tapestry needle (a needle that wool can be thread through)
+ A pair of scissors

1. To begin, make a slipknot with your first choice of wool and thread your hook through it. 
2. Make four chain stitches, letting the hook do all of the work and making sure they aren't pulled too tight.

3. Join the chain stitches with a slip stitch into the first chain stitch, creating a ring. This is the foundation for your square. Make three chain stitches (this creates the first treble for the round).
4. Next to the 3 chain stitches, make two treble stitches. This is the first cluster of stitches.

5. Make two chain stitches in order to create the corner of your square. 
6. Make three more treble stitches to create the next cluster. 

7. Repeat steps 5 and 6 another two times to create all four clusters.
8. Make two chain stitches and poke the hook into the top edge of the first treble cluster.

9. Slip stitch into the top edge of the first treble cluster to end the first round.
10. Finish the first round by cutting the wool and slipping the thread through to hook loop and pull tight. 

11. To begin the next round, take your second choice of wool and slip knot it onto the hook. Then slip stitch into a corner of the first round and make three chain stitches. 
12. Similar to the first round, make two treble stitches next to the three chain stitches, then make two chain stitches and make three more treble stitches to make the first corner of the second round. Make one chain stitch to create the gap between the corner cluster and the next cluster.

13. Repeat this three more times to make the second round, remembering to make two chain stitches in between the corner clusters and to only make one chain stitch in between all other clusters. Finish off round.
14. Take your third choice of wool and repeat the same steps as for round two. Each round has more clusters then the last. 

15. Repeat again for your fourth choice of wool...
16. ...and your fifth choice of wool. I have chosen to only have five rounds for my granny squares but you can choose to keep going for as little or as long as you like.

17. To finish your granny square sew up all of the ends by threading the tapestry needle and threading through 3-4 stitches at the back of the granny square.
18. Then thread through the same stitches again but this time thread the other way to ensure the wool won't some undone. Repeat for all of the ends. As this is the boring part of crocheting, I like to stitch each finished square as I go so I don't end up with lots of squares to sew up right at the very end. 

And there you have it! An easy, and super cute, granny square! I hope this tutorial has help and inspired you to maybe crochet a granny square blanket of your own! If you have any questions leave a comment and I will hopefully be able to answer them. Also, let me know if you do have a go, I would love to see it! 

Monday, 11 August 2014

Granny Square Blanket

As I mentioned in this post, I try to make a new crochet blanket every winter. This year I started a big granny square blanket made from some of my mums scrap wool. In the past I've always followed a pattern and a strict colour theme when making a blanket, so it's really fun to just be able to make it up as I go and pick which ever colours I'm feeling at the time. Even though this blanket is really bright and quite different to anything I have done in the past (you can see some of my other crochet blankets here and here) I really really love it and am thinking of maybe doing something similar but with a black or grey border instead of the white next! 

Do you love crochet too? Or would you maybe like to learn how to? I'm thinking of posting a tutorial on how to make a granny square, if I can figure out an easy and understandable way to do it (I have a feeling I crochet left handed which could be a bit of an issue ha!). If I can figure it out, I will try to have a tutorial up before winter ends!    

Friday, 6 December 2013

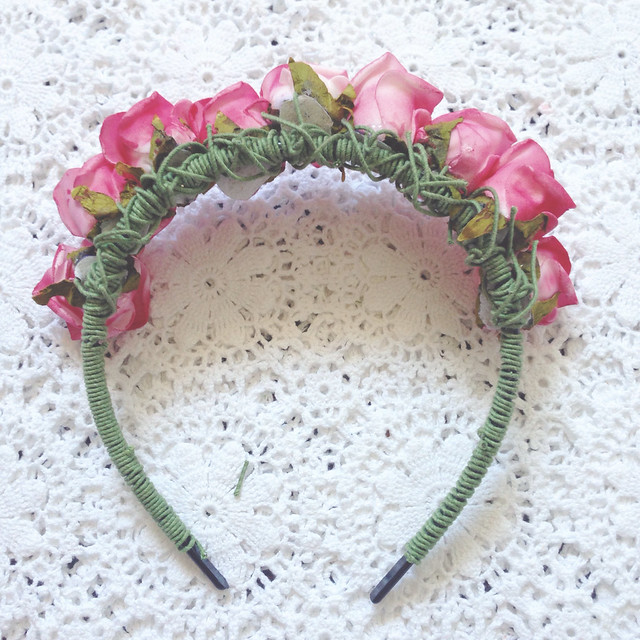
DIY Floral Crown


On the weekend I'm going to a fancy dress party where we all have to dress up as our favourite singer or band. I decided that it would be fun to go as Lana Del Rey based on this picture, and so wanted to include a floral crown as part of my outfit. Instead of just going out and buying one, I thought I'd have a go at making my own! Here is my process of making a floral crown incase you were wanting to make one for yourself!

What you need:
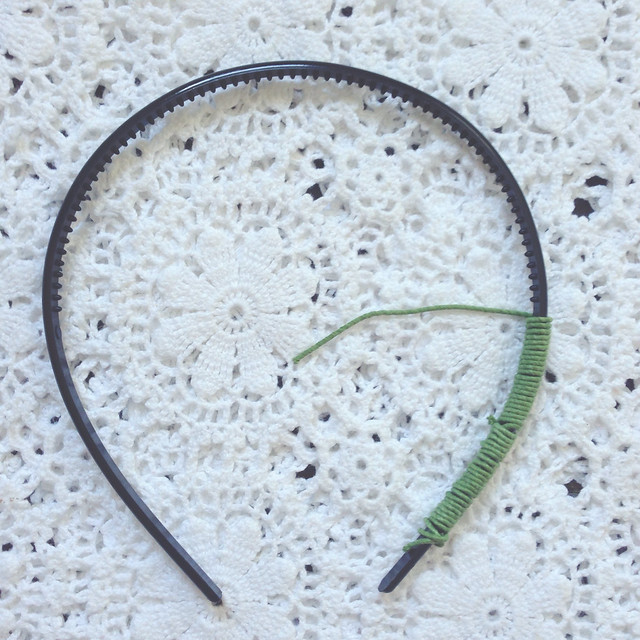
- A headband
- Stem wire
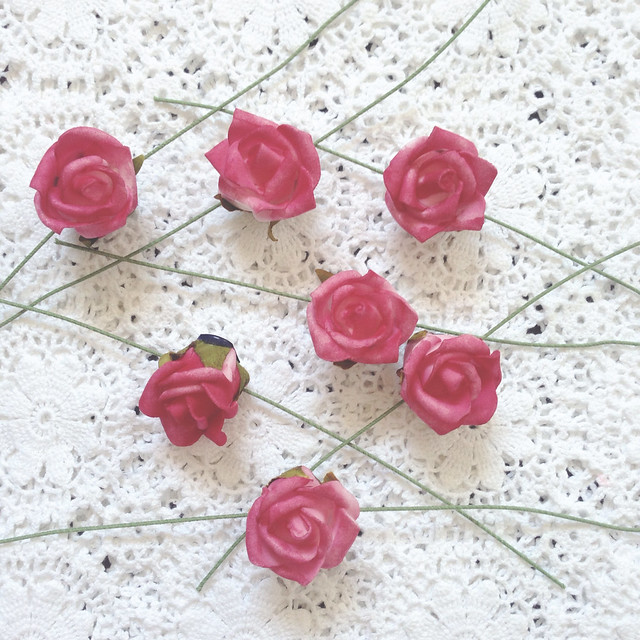
- Pretty flowers (I used some artificial flowers from a craft store)

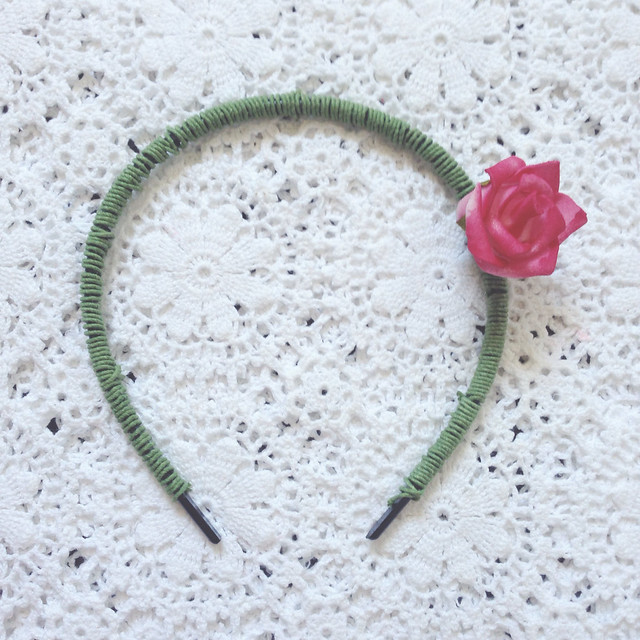
To begin, wrap the stem wire around the entire headband.
Next, attach a piece of the stem wire to the flowers by threading, tying, or glueing. 
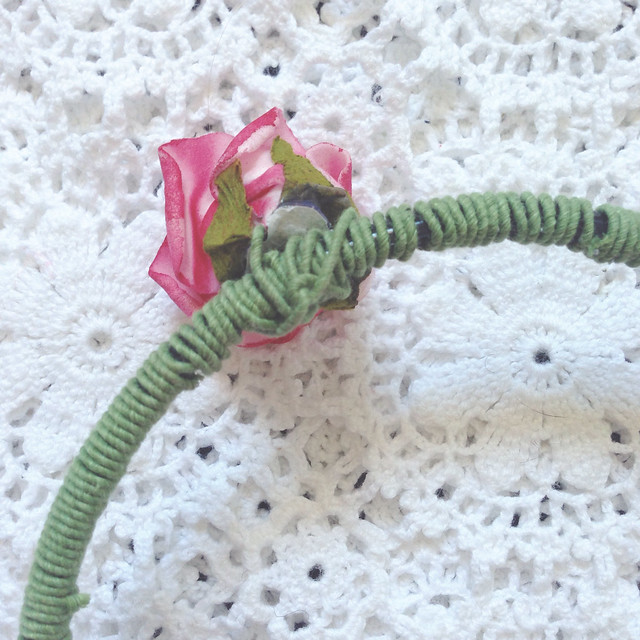
Attach the flowers on to the headband by twisting the stem wire into a sturdy knot. 
When done the knots look like a lovely vine from the back! 
It's as simple as that! This little project only took me about an hour to make and is the perfect summer accessory! 

Monday, 25 November 2013

Homemade Bircher Muesli


One of my goals for this summer is to become a bit healthier and something that I have always struggled with is eating a healthy and wholesome breakfast everyday. I'm glad to say that over the last couple of weeks I have become a lot better at actually putting some effort into breakfast! I've made my own muesli and have been making lots of fruit smoothies and now my mum has started making homemade bircher muesli, which I am loving! It is so delicious that I thought I would share a recipe with you that you might like to try for yourself! 

Ingredients: 
- Rolled oats 
- Pepitas (pumpkin seeds)
- LSA 
- Palm sugar
- Milk (I use soy milk which I think works really well!) 

Method:
To keep it simple, it is a good idea to just use a jar to put all of the ingredients in! A basic guide is to fill up the jar 3/4s of the way with the rolled oats, pumpkin seeds (as many as you like, it gives the muesli a nice crunch!) and LSA (only a tiny amount, about a teaspoon, is needed), and then fill the jar up to the brim with the milk. To finish sprinkle some palm sugar on top and leave it in the fridge for at least an hour (it's best when left over night!). Feel free to add whatever you like, that's one of the best things about muesli, there are so many different variations! Enjoy!  

Monday, 11 November 2013

Going To Market


It's less then two weeks until the Elizabeth Handmade Market and I've been very busy sewing and making some lovely things for a stall I'm going to have there. Above is a sneak peek of two of the pretty dresses I have made that will be available to buy from my stall! If you're in Launceston, come along and support some local makers and have a look at some of the lovely goods that will be available (take a look at the other stallholders here)! Here are the details: 

Wednesday, 18 September 2013

A Dress I Made


Recently I've started making my own dress patterns and have finally gotten to a stage where I feel confident enough to make some dresses out of some of the pretty fabric I have collected over the years. The fabric for this dress was cut from an extra large vintage dress I had bought from an op-shop. I love to recycle clothing and give new life to old, unused dresses! Even though I have decided to keep this dress, I am excited to let you know that I have applied for a market in November where I hope to sell more dresses like this one! Shortly after the market I also am hoping to start up my online shop where I will also be selling some dresses and other lovely goods, just so no one misses out! Excited to share more updates soon!